Support

How-To
Guides

01

Inetz Email Setup Instructions

Use these instructions to access your Inetz email account through webmail or configure your email on a computer, tablet, or smartphone.

Access Your Email Using Webmail

You can access your email from any web browser without installing or configuring an email application.

Webmail: https://webmail.inetz.com

Username: Your complete email address (for example, yourname@yourdomain.com)

Password: Your email account password.

Manage Your Email Account

You can change your password and manage your account preferences through webmail.

  1. Log in at https://webmail.inetz.com.
  2. Select Settings (gear icon).
  3. Select Password to change your account password.
  4. Select Out of Office to configure automatic vacation replies and other out-of-office settings.

Configure Your Email Application

These settings can be used with most email applications, including Microsoft Outlook, Apple Mail, Mozilla Thunderbird, and email apps on iPhone and Android.

When adding an account, choose IMAP if prompted to select an account type.

Recommended Email Settings

Incoming Mail (IMAP)

SettingValue
Servermail.inetz.com
Port993
Connection SecuritySSL/TLS
AuthenticationNormal Password
UsernameYour complete email address

Outgoing Mail (SMTP)

SettingValue
Servermail.inetz.com
Port465
Connection SecuritySSL/TLS
AuthenticationNormal Password
UsernameYour complete email address

Important: Your outgoing SMTP server requires authentication. Enable "My outgoing server requires authentication" if your email application provides this option. Use the same username and password as your incoming mail server.

Alternative Settings (If the Recommended Settings Do Not Work)

If your email application cannot connect using the recommended settings, try these alternatives:

ServiceAlternative PortConnection Security
Incoming IMAP143STARTTLS
Outgoing SMTP587STARTTLS

You do not need to change both settings. For example, you can use incoming port 993 with SSL/TLS and outgoing port 587 with STARTTLS.

Always use an encrypted connection. Do not select "None" or disable connection security to make your email work.
02

SFTP Client Setup

Connection Information

  • Host: <host>-sftp.inetz.com
  • Port: 2222
  • Protocol: SFTP
  • Username: <first initial and last name, for example jdoe>
  • Password: You will receive the password via an email from our Secure Message system. Follow the instructions in the email to retrieve the message that contains the password.

Make sure to specify the custom port (2222 rather than 22), as well as the protocol (SFTP rather than FTP).
Also note that Shell and SSH access is disabled, so SCP is disabled too.

Password Expiration Information

Currently the password expires every 90 days. You will receive an email to reset your password before it expires.
However, we can also set up SSH keys for authentication instead. Let us know if you wish to go this route and we can help you get it set up.
Once you have retrieved the password, you should be able to log into your account using the settings provided above.

FileZilla Example

We highly suggest using FileZilla as your SFTP program. It is free to download and confirmed to work correctly.
You can download it from here: https://filezilla-project.org/download.php?show_all=1
After you install and launch FileZilla, you will want to go into the Site Manager (under the File menu), then click on the "New Site" button on the lower left side and specify all the correct information:

  • Host: <host>-sftp.inetz.com
  • Port: 2222
  • Protocol: SFTP - SSH File Transfer Protocol
  • Logon Type: Normal
  • User: <jdoe>

03

Editing Your Hosts File

Edit the Hosts File on a Mac

Step 1 – Open the Terminal.app

Open the Terminal app by going into Applications -> Utilities -> Terminal. (You can also use Spotlight to open Terminal: hold down the Command key, press the space bar and type "Terminal".)

Step 2 – Open the hosts file
Open the hosts file by typing this into the Terminal that you have just opened:
sudo nano /private/etc/hosts
Press Enter, then type in your Mac user password when prompted

Step 3 – Edit the hosts file

Navigate to the bottom of the file using your arrow keys. Then add to the bottom of the file the IP addresses and website addresses (we will provide the actual IP address and domain name for you to use) that need to be added to the hosts file:

199.16.170.100    www.inetz.com
199.16.170.100    inetz.com

Step 4 – Save the hosts file

When done editing the hosts file, hold down Control and press O to save the file. Press Enter at the filename prompt, and then hold down Control and press X to exit the editor.

Step 5 – Flush the DNS cache

Type this into Terminal:
dscacheutil -flushcache
Then press Enter

Step 6 – Test
Go to the website you just added to the hosts file and verify that you can see the website.

To change back to the previous setting, follow the steps above, but in Step 3 add a pound symbol (#) in front of the lines you added to the hosts file. Then in Step 6, you should see the original website.

04

How to Clear Your Browser Cache

Your browser is the program you use to visit websites on your computer or phone. Common browsers include Google Chrome, Microsoft Edge, Mozilla Firefox and Safari (on Mac and iPhone).

To help websites load faster, browsers temporarily save parts of websites, such as images and code, on your device. This is called caching, and the saved files are stored in your browser’s cache.

However, if a website changes (for example, after an update), your browser might still show you the old version from its cache instead of loading the latest version from the internet. This can be a problem if you're trying to view recent updates but don’t see them.

The simplest and fastest way to view recent changes on a website is to hold down the Shift key and click the "Refresh" or "Reload" button in your browser. (This is often called a "hard refresh.") This usually forces your browser to load the most recent version of the page directly from the server. However, it only applies to the specific page you're viewing and may not update all external files, such as images, stylesheets or JavaScript. In those cases, you may need to clear your browser’s cache to fully see the updated content on the site.

To fix this, you can clear your browser’s cache. This removes the stored files, so your browser will load the newest version of the website.

Click the browser name you are using below for full instructions on how to clear the cache.

Google Chrome

Open Chrome (if it’s not already open).

Open the “Clear browsing data” dialog

On Windows, press Ctrl + Shift + Delete

On Mac, press Command + Shift + Delete
Alternatively, you can open it via the menus: click the three-dot menu → Delete browsing data…

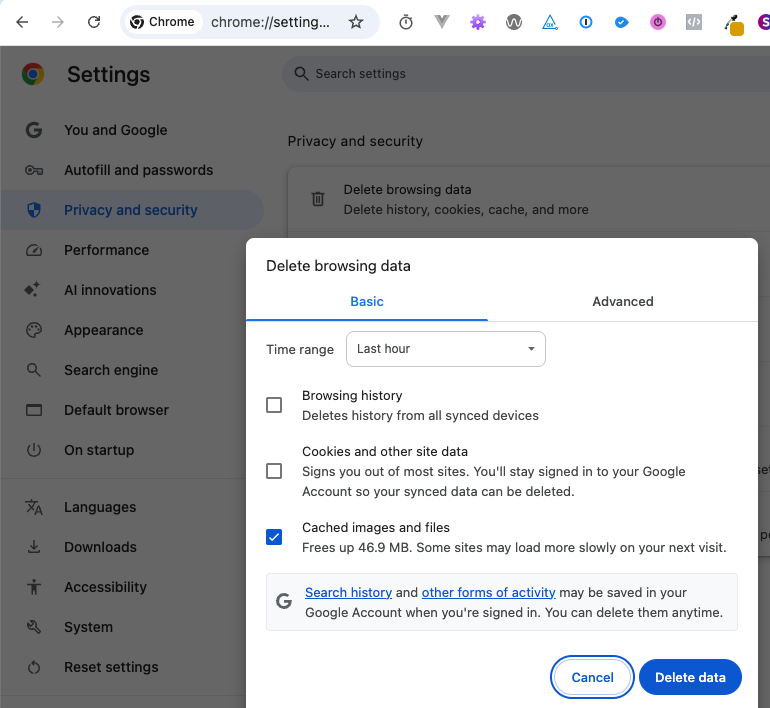
The Delete browsing data dialog in Chrome

Choose the Time range (e.g. “Last hour,” “Last 24 hours,” or “All time” to clear everything).

In the “Delete browsing data” dialog:

Make sure “Cached images and files” is checked.

(Optionally) you may also check “Cookies and other site data” or “Browsing history”, but note this will likely log you out of this and other sites.

Click Delete data.

Mozilla Firefox

Open Firefox (if it’s not already open).

Open the “Clear Recent History” dialog:

On Windows: press Ctrl + Shift + Delete

On Mac: press Command + Shift + Delete

Or use the menu: three-line menu (≡) → History → Clear Recent History…

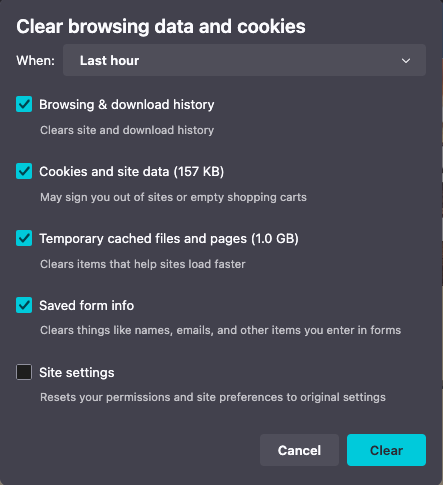
The Clear Recent History dialog in Firefox

In the “Clear browsing data and cookies” dialog:

Select the Time range to clear (Last hour, Last 24 hours, Everything).

Click the arrow next to Details (if not already expanded).

Make sure Temporary cache files and pages is checked.

(Optional) Also check “Cookies and site data” or “Browsing & download history” if you want to remove those, but note this will likely log you out of this and other sites.

Click OK to clear the selected data.

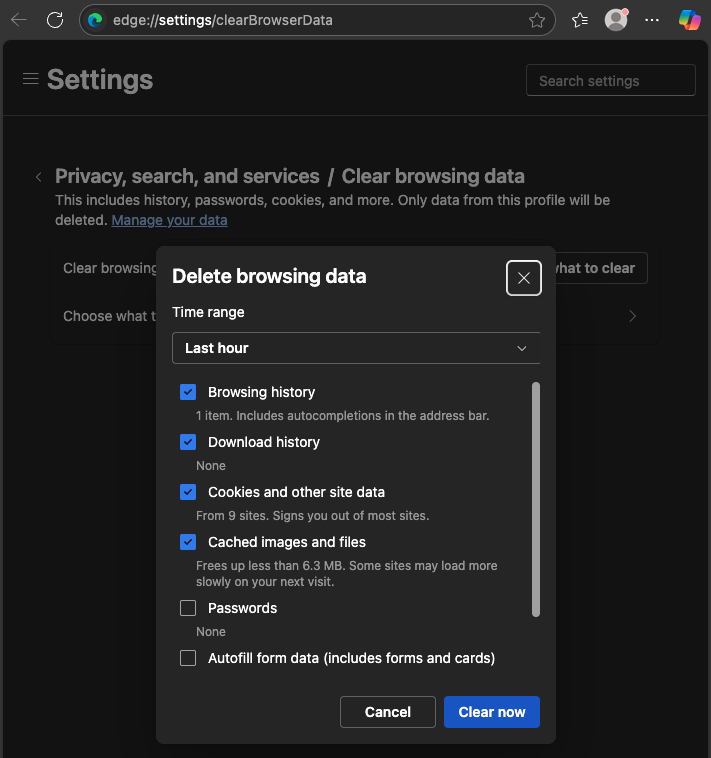
Microsoft Edge

Open Microsoft Edge (if it’s not already open).

Open the “Clear browsing data” dialog:

  • On Windows: Press Ctrl + Shift + Delete
  • On Mac: Press Command + Shift + Delete

Alternatively, you can open it via the menus:
Click the three-dot menu (⋯) in the upper-right corner → Settings → Privacy, search, and services → under Clear browsing data, click Choose what to clear.

Choose the Time range (e.g., “Last hour,” “Last 24 hours,” or “All time” to clear everything).

The Clear browsing data dialog in Edge

In the “Clear browsing data” dialog:

  • Make sure “Cached images and files” is checked.
  • (Optionally) you may also check “Cookies and other site data” or “Browsing history”, but note this will likely log you out of this and other sites.

Click Clear now.

Safari

Open Safari (if it’s not already open).

Open the “Clear browsing data” dialog:

  • On Mac: Press Command + Option + E (only works if the Develop menu is enabled)
  • Alternatively: Click the Safari menu in the top menu bar → Clear History…
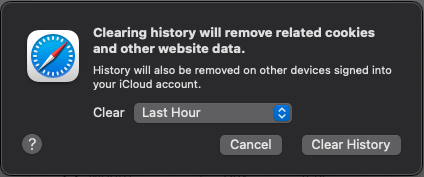
The Clear History dialog in Safari

Choose the Time range (e.g., “the last hour,” “today,” “today and yesterday,” or “all history” to clear everything).

In the “Clear browsing data” dialog:

  • Note: Safari’s default Clear History option removes history, cookies, and cached files together.
  • To clear only cached files, enable the Develop menu:
    • Go to Safari → Settings → Advanced → check “Show Develop menu in menu bar.”
    • Then click Develop → Empty Caches from the top menu.

Click Clear History (or Empty Caches if using the Develop menu).